Mỗi khi bắt đàu code một thứ gì đó, python, java, hay IaC như Terraform, dạo này thì mình đang nghiên cứu về Lono (sẽ sớm lên bài viết) thì bước đầu tiên bao giờ cũng là chuẩn bị môi trường, cài cắm các thứ vào máy để dev, chưa kể đến việc quản lý version của các engine.
Nếu như dùng Terraform thì có Tfenv, hay ruby có rbenv… vâng vâng nhưng nếu như là kubectl hay aws-cli, helm, ansible…thì sẽ phải quản lý như thế nào? Tạo máy ảo, cài cắm và code thông qua máy ão?
Trong bài viết này mình xin chia sẽ cách khởi tạo nhanh môi trường dev với docker và VScode.
Chuẩn bị
Trong bài viết này mình dùng hệ điều hành macOS, các bạn dùng hệ điều hành khác có thể làm tương tự.
Cài đặt VScode
Bạn vào link này để tải và cài đặt.
Cài đặt docker
Bạn vào link này để cài đặt docker.
Vì cài đặt hai tools trên khá là đơn giản nên mình sẽ không nói chi tiết.
Cài đặt extensions
Bạn có thể vào link này để cài đặt hoặc truy cập vào thanh menu bên trái tìm và cài đặt extensions Remote-container.
Cách hoạt động
Nhình chung thay vì bạn sẻ cài đặt tất cả các engine lên máy của bạn, thì bạn sẻ cài chúng lên container, sau đó thông qua extensions bạn sẻ remote vào container đó để code
Tất cả code của bạn sẻ được đưa vào container thông qua cơ chế bind muont
Cấu hình
Trong VScode bấm tổ hợp phím command+shift+p(nếu bạn dùng hệ điều hành khác thì thay command bằng control) sau đó tìm từ khóa như hình bên dưới.
chọn Remote-container: Open Container Còniguration File
ở đây mình có chuẩn bị sẳn file mẫu, các bạn có thể tham khảo.
// For format details, see https://aka.ms/vscode-remote/devcontainer.json or the definition README at
// https://github.com/microsoft/vscode-dev-containers/tree/master/containers/ubuntu-18.04-git
{
"name": "Lono-dev",
"dockerFile": "./Dockerfile",
"context": ".",
// Use 'settings' to set *default* container specific settings.json values on container create.
// You can edit these settings after create using File > Preferences > Settings > Remote.
"settings": {
"terminal.integrated.shell.linux": "/bin/zsh",
},
// Use 'appPort' to create a container with published ports. If the port isn't working, be sure
// your server accepts connections from all interfaces (0.0.0.0 or '*'), not just localhost.
// "appPort": [],
// Uncomment the next line to run commands after the container is created.
// "postCreateCommand": "uname -a",
// Uncomment the next line to use Docker from inside the container. See https://aka.ms/vscode-remote/samples/docker-in-docker for details.
"mounts": [
"source=/var/run/docker.sock,target=/var/run/docker.sock,type=bind",
"source=/Users/quannhm/.zshrc,target=/root/.zshrc,type=bind",
"source=/Users/quannhm/.gitconfig,target=/root/.gitconfig,type=bind",
"source=/Users/quannhm/.ssh,target=/root/.ssh,type=bind",
"source=/Users/quannhm/.aws,target=/root/.aws,type=bind",
],
// Uncomment the next line if you will use a ptrace-based debugger like C++, Go, and Rust
// "runArgs": [ "--cap-add=SYS_PTRACE", "--security-opt", "seccomp=unconfined" ],
// Uncomment the next line to have VS Code connect as an existing non-root user in the container.
// On Linux, by default, the container user's UID/GID will be updated to match your local user. See
// https://aka.ms/vscode-remote/containers/non-root for details on adding a non-root user if none exist.
// "remoteUser": "vscode",
// Add the IDs of extensions you want installed when the container is created in the array below.
"extensions": [
"kddejong.vscode-cfn-lint",
"wesbos.theme-cobalt2",
"PKief.material-icon-theme",
"redhat.vscode-yaml",
"withfig.fig"
]
}
mình sẻ gỉai thích sơ về phần cấu hình.
"name": "Lono-dev",
"dockerFile": "./Dockerfile",
"context": ".",
phần này cấu hình vị trí Dockerfile, contexr build, tên của môi trường remote.
"settings": {
"terminal.integrated.shell.linux": "/bin/zsh",
},
Phần này cáu hình shell mà mình sẽ sử dụng, vì mình dùng macOS và đã quen với zsh nên mình sẻ dùng zsh, bạn nào dùng bash thì có thể điều chỉnh lại cho phù hợp.
"mounts": [
"source=/var/run/docker.sock,target=/var/run/docker.sock,type=bind",
"source=/Users/quannhm/.zshrc,target=/root/.zshrc,type=bind",
"source=/Users/quannhm/.gitconfig,target=/root/.gitconfig,type=bind",
"source=/Users/quannhm/.ssh,target=/root/.ssh,type=bind",
"source=/Users/quannhm/.aws,target=/root/.aws,type=bind",
]
Đây là phần cấu hình mount data từ bên ngoài vào container, mặc định, khi khởi chạy container thì thư mục bạn đang đứng sẽ được mount vào container, ở đây mình dùng git, dùng ssh-key, dùng aws-cli, zsh và docker, why docker? nếu bạn muốn sử dụng docker bên trong container.
Lưu file này lại, bạn sẽ thấy ở thư mục làm việc sẻ có một thư mục mới là .devcontainer
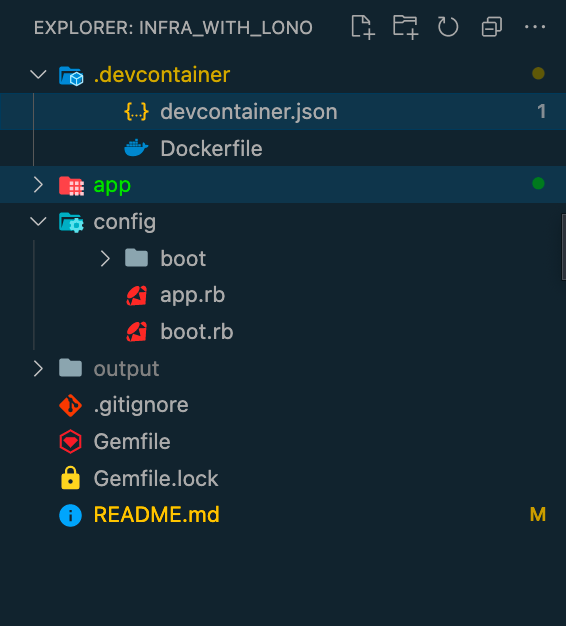
Dockerfile
Tùy thuộc vào dự án bạn đang develop, bạn có thể tham khảo file này, mình đang làm việc với ruby
FROM ruby:3.1.0
RUN apt-get update && apt-get install -qy wget unzip curl git procps apt-transport-https ca-certificates curl gnupg2 software-properties-common
# ==> Install docker-cli
RUN curl -fsSL https://download.docker.com/linux/debian/gpg | gpg --dearmor -o /usr/share/keyrings/docker-archive-keyring.gpg
RUN echo "deb [arch=amd64 signed-by=/usr/share/keyrings/docker-archive-keyring.gpg] https://download.docker.com/linux/debian $(lsb_release -cs) stable" | tee /etc/apt/sources.list.d/docker.list
RUN apt-get update && apt-get install -qy docker-ce-cli
# ==> Install AWS cli
RUN apt-get install python python3-pip -qy
RUN pip install awscli
# ==> Install jq
ADD https://github.com/stedolan/jq/releases/download/jq-1.6/jq-linux64 /usr/local/bin/jq
RUN chmod +x /usr/local/bin/jq && jq --version
# ==> Install zsh, direnv (not required by Gitlab Pipelines)
# move to separate dockerfile
RUN apt-get install direnv zsh -yq && sh -c "$(curl -fsSL https://raw.github.com/ohmyzsh/ohmyzsh/master/tools/install.sh)" \
&& echo 'eval "$(direnv hook zsh)"' >> $HOME/.zshrc \
&& curl -sL https://howtowhale.github.io/dvm/downloads/latest/install.sh | sh \
&& echo 'source /root/.dvm/dvm.sh && dvm detect' >> $HOME/.zshrc \
&& echo '[[ -r $DVM_DIR/bash_completion ]] && . $DVM_DIR/bash_completion' >> $HOME/.zshrc
# ==> Clean
RUN apt-get remove -qy wget unzip python-pip && apt-get clean
# ==> Install Lono framework
RUN gem install lono --prerelease
RUN echo "export PATH=/usr/local/bin:/\$PATH" >> ~/.zshrc
Khởi tạo môi trường
Sau khi chuẩn bị hết mọi thứ, giờ đến lúc khởi tạo môi trường. Trong VScode bấm tổ hợp phím command+shift+p(nếu bạn dùng hệ điều hành khác thì thay command bằng control) sau đó tìm từ khóa như hình bên dưới.
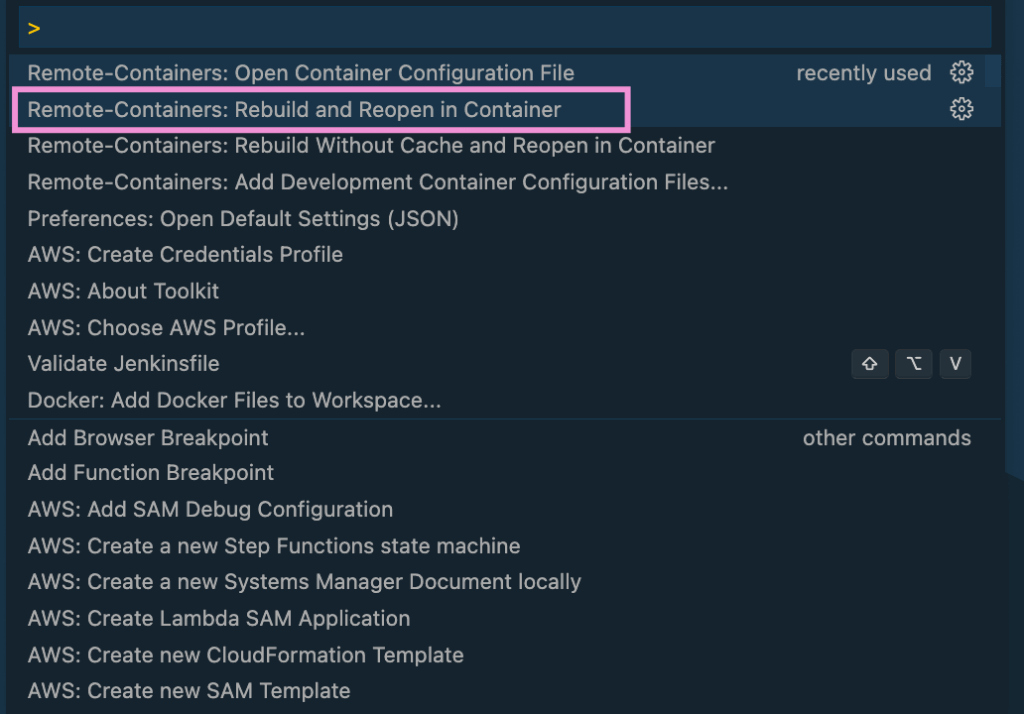
Đơi một lúc để build xong container, những lân sau sẻ nhanh hơn. Kiểm tra góc dưới bên trái, bạn sẻ thấy như hình bên dưới.
nếu bạn có cập nhật file cấu hình hoặt Dockerfile, bạn chỉ cần rebuild lại container.
Để thoát khỏi chế độ remote vào container, bạn bấm vào góc dưới bên trái và chọn như hình dưới.
Tổng kết
Trên đay mình đã giới thiệu đên các bạn cách để khởi tạo nhanh môi trường dev, mà không ảnh hưởng đến môi trường gốc, hoặc bạn muốn vừa code máy cá nhân và vừa code máy công ty trên cùng một project, hay chỉ đơn giản là bạn không muốn lúc demo thì lại gặp issue 🙂