Đôi khi chúng ta sẽ phải làm việc trên một cửa sổ window hay nhiều cửa sổ (windows) trong dự án Automation Test cho nhiều tình huống kiểm thử khác nhau. Để có thể xử lý và kiểm soát được các hoạt động trên các cửa sổ khác nhau, chúng ta sẽ sử dụng các phương thức tích hợp của webDriver API.
Trước khi bắt đầu bài này, các bạn cần biết
- Tạo Selenium Automation Test với maven – Intellij IDEA
- Cách dùng WebDriverManager với Selenium
- Window handle trong Selenium WebDriver
- Selenium Locator
Bây giờ chúng ta bắt đầu nhé!
Các phương thức được sử dụng để xử lý nhiều cửa sổ trong Selenium
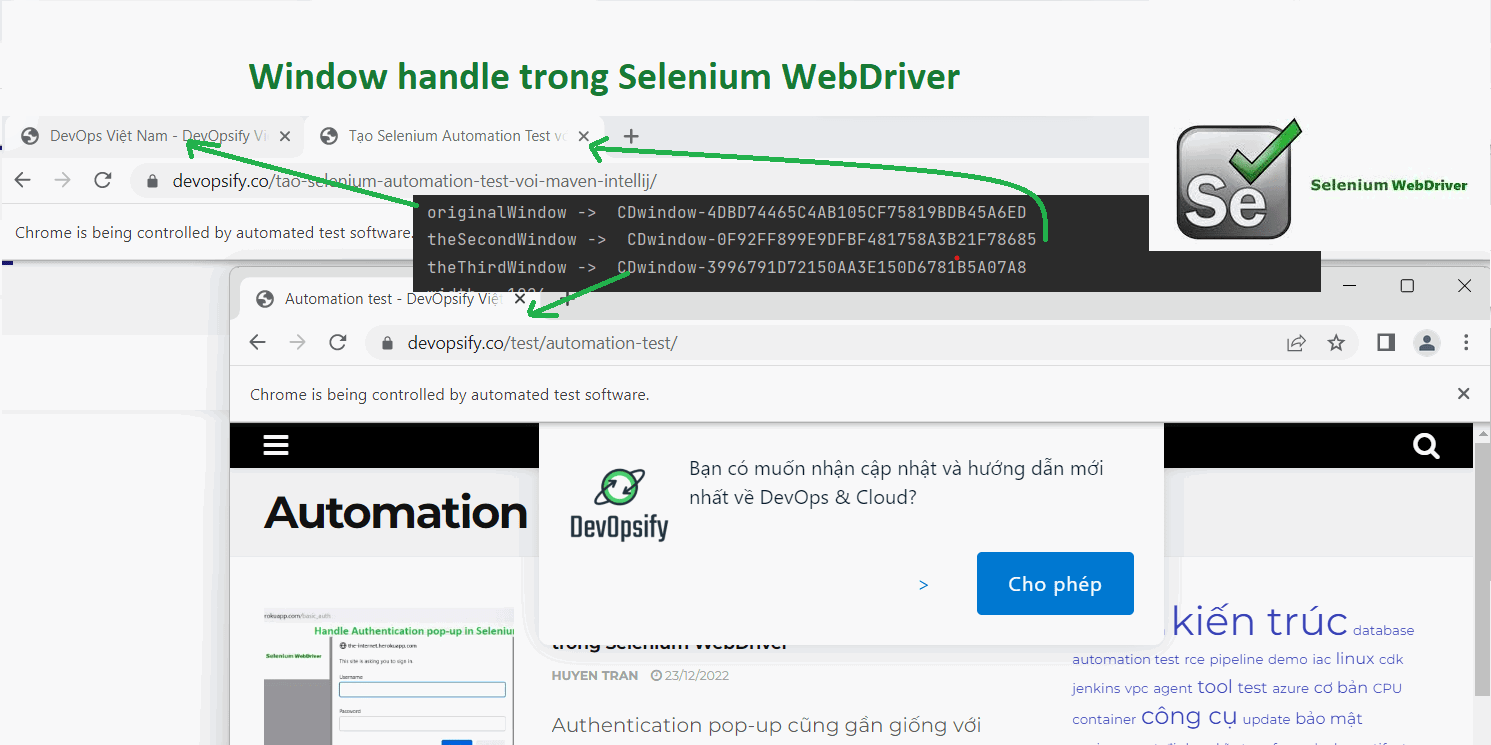
Window handle là một ID duy nhất chứa địa chỉ của tất cả các cửa sổ. Về cơ bản, đây là một con trỏ trỏ tới một cửa sổ, trả về giá trị chuỗi. Chức năng Window handle này giúp lấy các handles của tất cả các cửa sổ. Đảm bảo rằng mỗi trình duyệt sẽ có một window handle duy nhất.


Đây là một số phương pháp sẽ được sử dụng để handle nhiều cửa sổ trong Selenium.
String get.windowhandle()
Phương thức này sẽ giúp bạn lấy được window handle của cửa sổ hiện tại (hay ta có thể gọi là original window hoặc là cửa sổ cha – parent window).
driver.getWindowHandle();
Set<String> get.windowhandles():
Phương thức này sẽ giúp bạn lấy handle của tất cả các cửa sổ đang mở. Bạn lưu ý là Window Handle không phân biệt tab hay window nhé, nó chỉ biết hiện tại có bao nhiêu cửa số và các tab đang mở.
Chúng ta cũng sẽ sử dụng phương thức Set để chứa tất cả các window handle theo kiểu String nhé

WebDriver.TargetLocator switchTo()
Phương thức này sẽ giúp chúng ta di chuyển qua lại giữa các cửa sổ.
driver.switchTo().window(target_window);
Kịch bản xử lý nhiều cửa sổ
Scenario:
- Truy cập vào trang chủ của website devopsify.co (Đây là cửa sổ cha – parent window)
- Mở tab mới và truy cập vào trang Automation Test (Đây là cửa sổ con thứ 1 – child window)
- Mở cửa sổ mới và truy cập vào trang Tạo Selenium Automation Test với maven – Intellij IDEA (Đây là cửa sổ con thứ 2 – child window)
- Từ cửa sổ cha, chúng ta sẽ di chuyển qua các cửa sổ con (child windows) để thực hiện các bước kiểm thử, sau đó chúng ta quay lại cửa sổ cha (parent window).
Các bước thực thi:
- Lấy handle của cửa sổ cha (parent window) bằng lệnh – driver.getWindowHandle(); Và in nó ra.
- Tuần tự mở các cửa sổ con (child windows)
- Lấy handles của tất cả các cửa sổ đang được mở đó bằng lệnh – driver.getWindowHandles();
- Sử dụng phương thức SwitchTo() để di chuyển qua lại giữa các cửa sổ.
Có nhiều cách code để thực thi kịch bản trên như sau:
Cách 1 – Sử dụng Iterator
package SeleniumWebDriverTutorial;

import io.github.bonigarcia.wdm.WebDriverManager;
import org.openqa.selenium.WebDriver;
import org.openqa.selenium.WindowType;
import org.openqa.selenium.chrome.ChromeDriver;

import java.util.Iterator;
import java.util.Set;

public class MultipleWindowHandlesExample {
    public static void main(String[] args) throws InterruptedException {
        WebDriverManager.chromedriver().setup();
        WebDriver driver = new ChromeDriver();

        //Navigate to https://devopsify.co/
        driver.get("https://devopsify.co/");//parent window
        String parent_window=driver.getWindowHandle(); // Returns ID of single browser window

        //Open new tab and navigate to Automation Test child page
        driver.switchTo().newWindow(WindowType.TAB);
        driver.navigate().to("https://devopsify.co/test/automation-test/");
        Thread.sleep(3000);

        //Open new window and navigate to Tạo Selenium Automation Test với maven – Intellij IDEA child page
        driver.switchTo().newWindow(WindowType.WINDOW);
        driver.navigate().to("https://devopsify.co/tao-selenium-automation-test-voi-maven-intellij/");
        Thread.sleep(3000);

        //Get all ID's of Multiple open browser windows and store in Set
        Set<String> windwIDs = driver.getWindowHandles();

        //1. Using Iterator

	Iterator it = windwIDs.iterator();
        while(it.hasNext())
        {
            String child_window=it.next();
            if(!parent_window.equals(child_window))
            {
                driver.switchTo().window(child_window);
                System.out.println(driver.switchTo().window(child_window).getTitle());
                driver.close();
            }
        }
        //switch to the parent window
        System.out.println(driver.switchTo().window(parent_window).getTitle());
    }
}
Cách 2 – Sử dụng for each loop
package SeleniumWebDriverTutorial;

import io.github.bonigarcia.wdm.WebDriverManager;
import org.openqa.selenium.WebDriver;
import org.openqa.selenium.WindowType;
import org.openqa.selenium.chrome.ChromeDriver;

import java.util.Set;

public class MultipleWindowHandlesExample {
    public static void main(String[] args) throws InterruptedException {
        WebDriverManager.chromedriver().setup();
        WebDriver driver = new ChromeDriver();

        //Navigate to https://devopsify.co/
        driver.get("https://devopsify.co/");//parent window
        String parent_window=driver.getWindowHandle(); // Returns ID of single browser window

        //Open new tab and navigate to Automation Test child page
        driver.switchTo().newWindow(WindowType.TAB);
        driver.navigate().to("https://devopsify.co/test/automation-test/");
        Thread.sleep(3000);

        //Open new window and navigate to Tạo Selenium Automation Test với maven – Intellij IDEA child page
        driver.switchTo().newWindow(WindowType.WINDOW);
        driver.navigate().to("https://devopsify.co/tao-selenium-automation-test-voi-maven-intellij/");
        Thread.sleep(3000);

        //Get all ID's of Multiple open browser windows and store in Set
        Set<String> windwIDs = driver.getWindowHandles();


        for(String handle:windwIDs)
        { if(!parent_window.equals(handle)){
                driver.switchTo().window(handle);
                System.out.println(driver.switchTo().window(handle).getTitle());
                driver.close();
            }
        }
        //switch to the parent window
        System.out.println(driver.switchTo().window(parent_window).getTitle());
        driver.quit();
    }
}
Cheers! 🙂


